
So, you know all about marketing… but remarketing? In this article, we’ll take a close look at this modern marketing technique, breaking it down into its various types and guide you through 5 key steps to really get it right. But first…
What exactly is remarketing?
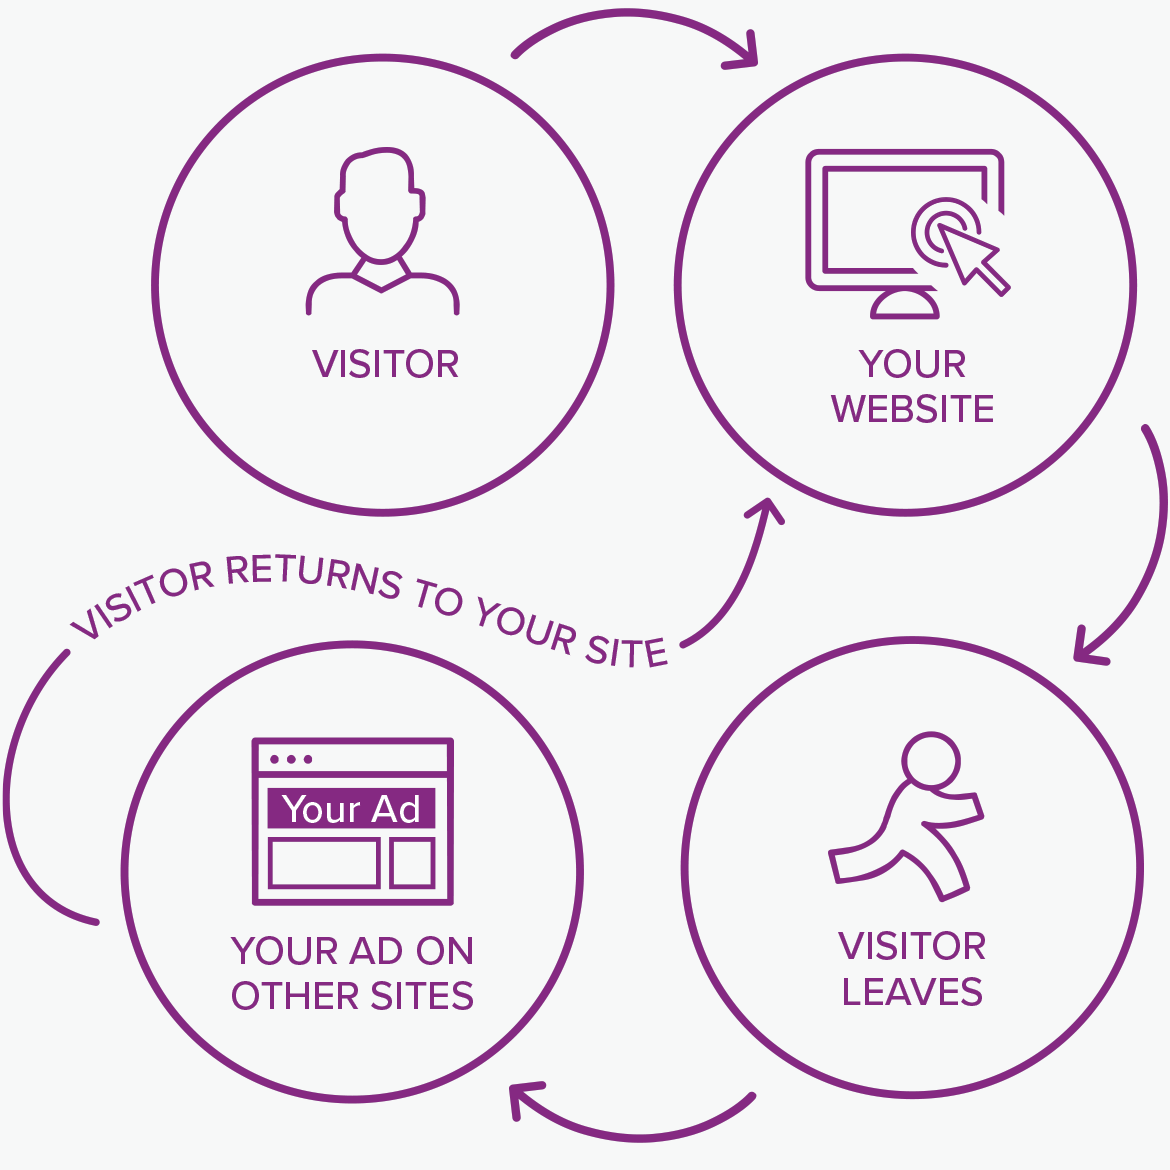
Remarketing is a way of re-engaging people who have been to your website but not taken an action. In the eCommerce space we’ve been seeing this for years. You know, those shoes you were looking at late one night that you’re now seeing ads for all over the internet? Well, that is remarketing at its simplest. There is a danger that, when executed so simply, brands that take this approach risk being bland, repetitive, transactional and, at worst, just plain cheap. The good news is that there are many different ways to do remarketing, and when executed well, it can be incredibly powerful for just about any brand, product or service.
Why is remarketing so important for your business?
Remarketing allows you to use other websites to display targeted ads to prospects who have previously visited your site. So, while prospects who have been to your site are browsing away on other sites, your ads can be shown to them.
When you look at it from this angle, remarketing is one of the most potent and effective ways to re-target, engage and convert prospects. In fact, recent research1 has shown that customers who see retargeted ads are 70% more likely to convert on your website, so it’s a method well worth consideration.
There are a number of remarketing types, including:
- Standard: Static or HTML ads to prospects who have been to your website before
- Dynamic: Show ads for the exact products or services the prospect interacted with on your website
- Search (RLSA): Present ads to past visitors on the search network, at the point that they’re checking out alternatives to your product or service
- Video: Display ads to individuals that have engaged with your YouTube channel or other videos
- Email list: Target specific prospects on your email list
To do remarketing well, it’s important to be comfortable with certain key concepts. Below is a step-by-step guide for successfully launching a remarketing campaign:
Step 1: Understand and follow the rules
Remarketing campaigns tap into user’s activity on your website, and give you the ability to re-engage with non-converting prospects to encourage them to come back. Each platform will have their own set of rules and guidelines to follow. Failure to align your remarketing strategy and setup to meet the set guidelines will result in your campaign being ineligible to run.
Step 2: Define your remarketing strategy
Like all successful marketing, you’ll need an incisive strategy for winning over non-converting prospects via remarketing, or else you risk going round in circles with below par results.
A successful remarketing campaign:
- Is right on target: It empowers you to create direct, unique, and personalised ads that target the right prospects so as to supercharge the conversion process
- Helps you build relationships and gain trust: The faster prospects trust you as a brand, the quicker they will respond positively to your remarketing messages, click through, and convert. Doing this badly can cheapen and damage your brand
- Pre-selects prospects: It enables you to decide on the kind of visitors you’d like to target – e.g. those that have clicked on your ad, or even added a product to cart without purchasing
- Prevents over targeting: It ensures you’re not displaying the same product or service that customers have already purchased or worse, spamming them with too many ads until they switch off. So, instead of totally dominating a prospect’s browsing experience, the right strategy helps your brand stay on their minds until they’re ready to convert
If you’re looking through this and thinking that it’s a little overwhelming, that’s okay. There’s a lot to know about remarketing, and there are experts out there who can help get everything about your remarketing campaign (strategy, implementation, monitoring) just right, so you can just sit back and enjoy the results.
Step 3: Setup remarketing on your website
To ensure your remarketing campaign is successful and measurable, you will need to correctly set-up and install a remarketing tag on your website. This must be done right for your campaign to be effective and requires a fair bit of technical knowledge, so if you’re not sure then go the smart route and engage experienced professionals.
Step 4: Create your segmented lists
Once you have defined your remarketing strategy, and setup your remarketing tag, the next step is to setup your remarketing lists either via Google or directly within your remarketing platform of choice.
A remarketing list is a collection of your website visitors generated by the remarketing tag. Here, you set the parameters for adding in web users, so you can create different segments.
Of course, targeting everyone who visits your website is far from an effective remarketing strategy. A smarter approach will be to create segments based – for instance – on pages visited, purchase history, location, etc. and then target the different segments with ads customised to that segment. Additionally, you can tag prospect’s activities on your site, e.g. what pages they visited and what products or services they viewed, and re-target accordingly.
The visitors are added to the remarketing lists within seconds of visiting or interacting with your website, meaning that you are able to start remarketing to them right away. The remarketing tag adds users to segmented lists as they interact with your website, based on pre-set parameters.
As important as it is to create target lists, it’s also important to create exclusion lists, which includes users you don’t want to target to. For instance, there’s no point remarketing to repeat customers or visitors from locations (and other demographics) you do not serve, right?
While all of these may seem simple on paper, you may want to engage an experienced company (like us) who has the expertise and experience needed to pull this off successfully.
Step 5: Create your remarketing campaign
Now that your remarketing tag is live, and your segmented audience lists are created, you’re ready to launch your remarketing campaign! However, before you are able to start a remarketing campaign, your target list will need to have enough members on it. To begin with, you might only be able to start with a display campaign.
Developing a clear strategy would have assisted in choosing the right remarketing campaign type, or a combination, for your audience and your brand. When launching your campaign, ensure your ads are well branded. The creative and key messages need to spark a connection between your brand and the audience, directly correlating to the users’ activity on your website.
* Be aware of ‘over-targeting’, or ‘spamming’ your audience. Remarketing is about staying on the mind of your audience. Saturating non-converting visitors with ads can become a big turnoff and damage your brand image. There is a very fine line between remarketing tactfully and bombarding.
Wrapping it all up
As with all aspects of digital marketing, remarketing is a commitment and will need consistent and continuous optimisations and testing. It can be tempting to simply set and forget, or to use old ad formats from previous campaigns. But in reality, your target audience may have already came across these, or the messaging is no longer relevant, so you will need to be more creative and unique to avoid ad fatigue. As you test different approaches and get to know your audiences more, your ads and targeting will keep on getting better, but it takes time and patience. If you are not familiar with remarketing or the above sounds too overwhelming, we’re here to help!
References:
1 Lazar, M. (2018). These 2018 Retargeting Statistics Prove It Works
https://www.readycloud.com/info/these-2018-retargeting-statistics-prove-it-works


Be the first to comment on "Top 5 tips to rock your remarketing"